


I’ve taught English for over 4 years now, and I’ve only recently worked up the courage to teach my students the phonemic chart. Here’s why I did that:
- I wanted to enable my students to learn vocabulary autonomously. Some researchers, e.g. Paul Nation, argue that for high frequency words (top 1000/2000/3000 words) the best strategy is to learn them in a decontextualized way using translation and the keyword technique based on visual associations, and then get the feel for these words through exposure. I’ve experimented with the keyword technique learning German and it worked for me, so I decided to teach it to my students. However, it would be useless if they were unable to get the pronunciation right. While there are talking dictionaries online (e.g. howjsay.com), in my my opinion there’s still a case for teaching the students the phonemic script. The main reason is that it might be tricky to actually hear the sounds if you’ve already got an idea of how the word should be pronounced. In my case this was actually ridiculous – I’m not a native speaker of English and I learnt that ‘chocolate’ and ‘different’ are not actually pronounced as /ˈtʃɒkələt/ and /ˈdɪfərənt/ from Cutting Edge coursebook while teaching an elementary group of students. Another example is the /eə/ diphthong in words like ‘pair’ and ‘where’, and the final syllable in ‘considered’. I remember the moment when I first saw the phonemic transcription of these words. That moment was a revelation. I’d always felt that I must be pronouncing them incorrectly, because they didn’t ‘feel right’ in the mouth. The most striking thing about seeing the transcription was seeing the number of sounds. Before that, I’d always tried to say something like /peɪr/, /werə/ and /kɔ:nsɪderet/, and when I heard them I didn’t notice the way there were pronounced – or maybe I did notice but didn’t trust my ear. Another important reason why it’s worth spending some time teaching the students the script is that most students won’t bother going to the talking dictionary so unless they have a record of how the words are pronounced will end up learning the wrong pronunciation. By the way, if you have a list of words for the students to memorize in an Excel file, it’s very easy to produce a list of phonemic transcriptions in a matter of seconds using this excellent resource: http://www.photransedit.com/online/text2phonetics.aspx
- With my B2 teenage learners, I needed them to learn the chart so that they could develop listening skills by learning the language to formulate what it is they’re hearing before looking at the transcript/subtitles, and in this way build up an understanding of their individual listening weaknesses – more about that in a separate post.
This was the why, and here’s the how.
___________________________________________
Level: any, but with A1-A2 it helps if you speak the students’ L1
Length: 50-90 minutes (lower levels need more time to learn to pronounce the sounds)
Materials:
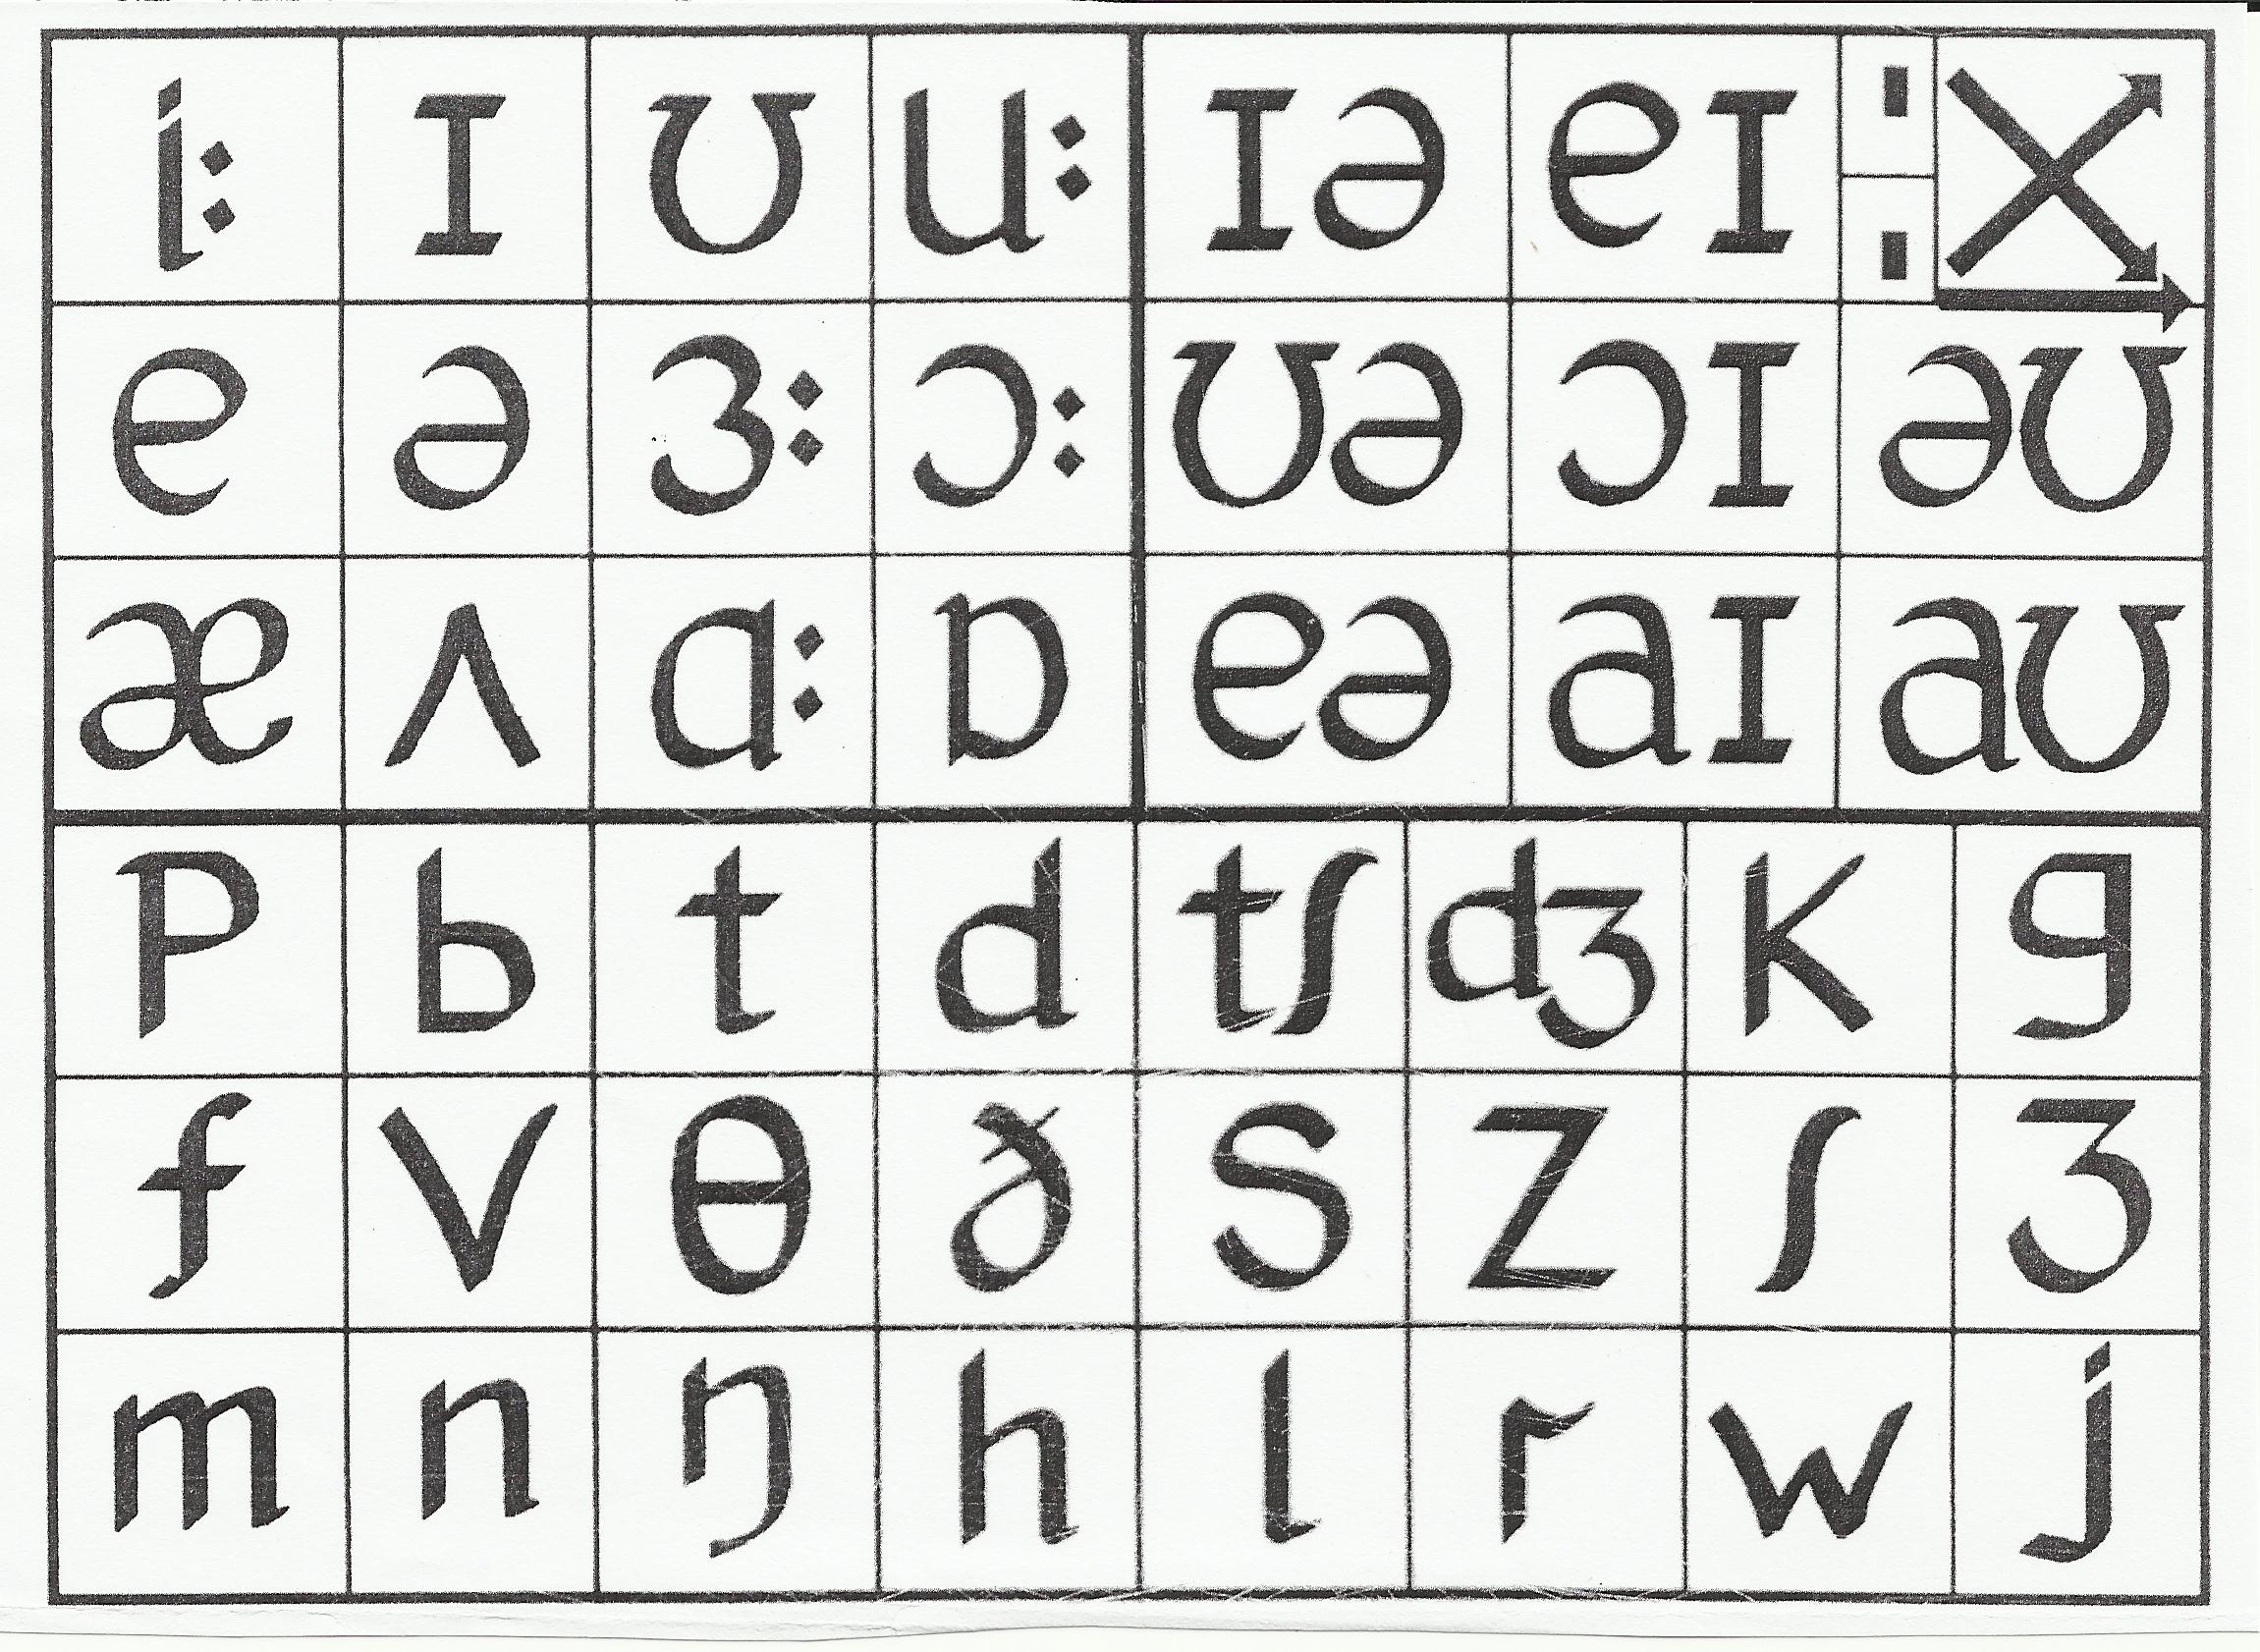
- A phonemic chart
- A set of 36 cards for each students (each A4 sheet can be cut into 16 biz card-sized cards)
- A print-out of the table with associations (below) to remind you which associations to suggest to students
- Optionally, a print-out of words written in the phonemic script for Stage 4
- Optionally, texts written in the phonemic script for homework.
___________________________________________
This procedure for memorizing the symbols was modified from the procedure I learnt in Advance club in St. Petersburg during a 2-day workshop on memory development. The trainer, an exceptionally inspirational educator Nickolay Yagodkin taught us to read the Korean alphabet in around 30 minutes using letter-word associations, and it was an incredibly joyful and gratifying experience.
Here are the key things to remember in this lesson
- The focus of this post is helping the students learn the symbols. However, you’ll need to teach the students how to pronounce the sounds (especially the vowels) before teaching the symbols; I use the procedure from an amazing workshop by Adrian Underhill (see the video below)
- it’s best not to assume that some consonant sounds, like /k/, are ‘trivial’ – the students will have all kinds of misconceptions about the phonemic chart, e.g. they will assume that there’s a /c/ sound in ‘cow’ or that /j/ sounds like the first sound in ‘jeans’. So it’s better to treat the whole chart in a systematic way and teach even those sounds that seem ‘obvious’; also, in some languages that use the Latin alphabet the letters are pronounced differently (e.g. ‘r’ is pronounced as /h/ in Portuguese).
- to learn that many symbols in one go, it’s a good idea to use mnemonics
- you’ll need to make sure that the students learn the symbols in batches of around 12 symbols. They will need the chance to revise each batch and then practice reading simple words for a bit before going on to the next batch. I personally start with vowels and then provide the students with lists of words to practice on, like /pʊl/ /pɔ:l/ /pɜ:l/, which I know they’ll be able to read even though we haven’t practiced these consonants yet. I’ve only got experience with Russian students, but it might be that the lists of ‘safe’ consonants may depend on the students’ L1.
___________________________________________
Here’s the procedure.
- Stage 1. Teach the students to pronounce the vowels
As I mentioned above, I use Adrian Underhill’s procedure. By the way, all videos of his workshops that I’ve seen online were remarkable and uplifting, and this one is no exception. Actually, it is such a treat that it’s worth watching even if you’re not going to teach anyone the phonemic chart. Do check it out.
Some notes that I took of ideas I personally found particularly valuable:
1. The vowel part of the phonemic chart is actually a picture of a human mouth: the number of the row shows how open the jaws are, the number of the column shows the position of the tongue + the shape of the lips
2. Before watching this video, I used to explain how to produce the problematic sounds ‘from scratch’. However, it’s much easier to help a student who’s mispronouncing a sound if you can figure out how they should adjust the current position of their tongue/jaws/etc in their mouth. In order to do this, mimic the sound they’re producing, then pronounce the ‘right’ sound – play with the two sounds to figure out what the physical differences are
3. In a similar manner, some troublesome sounds are easier to explain starting from an ‘easy’ sound that’s ‘close’ in the mouth (e.g. /r/ can be explained through /l/; /ŋ/ can be explained through /k/ – ask the students to pronounce /k/ and feel where the root of the mouth is; after that ask them to prepare the mouth to pronounce /k/ but pronounce /n/ – an ŋ will come out; /k/ is also useful when explaining the position of the tongue in /ɒ/ – get the s/s to practice with ‘cot’ and ‘cut’). But as I mentioned before, there’s much more in the video than these ideas, so do check it out.
Another useful technique that I learnt from Anne Thompson, my Delta Module 2 tutor, is to use your hands to illustrate for the student how to adjust their articulators: show the roof of the mouth with you left hand and show them how to adjust their tongue with your right hand:

- Stage 2. Teach the students the symbols using mnemonics.
The idea is visualize each symbol as part of an image – a word that contains this symbol. For example, ʌ looks like an umbrella or a cup turned upside down.
There are two important rules here.
1. It’s vitally important that the students do visualize the association and not just try to memorize the associated word. This really is the key element of this technique, because there are much more neurons involved in visualization than in any other type of processing and thus it’s actually possible to memorize hundreds of images in one sitting. So while they won’t be able to remember 32 ‘symbol + word’ pairs by the end of the lesson, the studnets will be able to remember 32 images containing the symbols – and thus, the symbols themselves.
2. As you work on each symbol, the students put the symbol (and only the symbol) on one side of a small card and the word on the other side. Ask the students not to draw their associations (and try not to draw anything on the board). Visual memory will kick in much more powerfully if the students visualize the images for themselves. Using L1 might be a good idea at this stage with lower levels, because there’s quite a lot of teacher talk involved, and using the students’ L1 you can encourage the students to add detail to the images (‘an old dusty bottle in a pirate’s chest’ will work much better than ‘a bottle’ here). I provide ideas for associations below – these are the words that we used with my groups, but actually it might be better to ask the class for the words – this will make sure that the vocabulary is right for their level. The only difficulty that might arise is that you might not be able to instantly come up with visual associations for each symbol, but if this happens you can always fall back one the ideas you prepared beforehand.
 -
i: Imagine a piece of cheese with i:-shaped holes ɪ If you circle it, it becomes a pig’s snout ʊ Turn it upside down and it becomes two legs, each one with a foot u: A moon. The dots are two stars. e an egg ə this is a picture of a relaxed half-open mouth saying this sound!
a flamingo
aroundɜ: bird
third (ɜ: looks like 3)
ɔ: A very unhappy smiley face which is Lord of the rings who’s lost the ring. æ an apple ʌ An umbrella
A cupɑ: a tongue
a bulging arm?ɒ A hot frying pan p a pen
a pillowa page in a booka price tag?b A bottle
A bagt Complete it to an upside town number ‘2’
time (two hands of a clock)
to type (with a finger)
a talond
dig (with a spade)a dalek! 😀f Complete it to a 4
The index fingerv vote θ A thumb or a theatre (the rod is the stage)
or this could be the picture of the mouth when it’s saying θð A pointing finger: ‘this’
A leather bagm moustache
McDonald’sn draw letter nine over it ŋ a long ‘n’ h A house (with a chimney) ʧ A chair turned upside down
A chicken?ʤ A jar of jam (ʒ is the jar, and d is a spoon to eat it with) k Add an oval at the top and it becomes a key
A cow (with horns)g glasses s Complete it to a six
A snakez Zorro
a zipʃ The heel of a shoe ʒ A television (TV-set) with an antenna l a leg r a piece of rope
the stalk of a rosew a wave
wings
add a femail head -> a wife
add two heads – twins
or maybe windscreen wipers?j A bottle of jogurt (the dot is the cap) - Stage 3
The students revise the 12 cards they’ve just written. They start with the words and try to remember the symbol. Having revised all 12 cards, they revise in the opposite direction: from the symbol to the word. Repeat this 3 times.
Board words for the next stage while they’re revising (unless you’ve got print outs) – fast finishers can go on to stage 4. - Stage 4 – board or print out some transcriptions for the students to read, e.g.
aɪ ɪər iːt et tiː tɔɪ eɪt ˈtuː ɪt teəz
teɪk tʊk keɪk kʌt kʊk ˈkɪk tɪk keə kaʊ kiː kæt kɒt
puːl pəʊl pɔːl piːl pɪl pæl paɪl peɪl pəʊl pɜːl
[option 1] S/s read phonemic transcriptions individually while T circulates and helps. After that, in pairs, one student reads one word and the second guesses which one this was.
[option 2] Work as a whole class. Each time, allow 5 seconds thinking time and then either signal with your hands that you want the whole group to pronounce the word or nominate someone. - Stage 5 – Repeat the procedure for another 12 sounds; provide more reading practice
(This could be turned into a game: challenge the students to brainstorm words that contain 2-4 specific consonants (e.g. only p and l) and any vowels; each student writes down the phonemic transcriptions; after 5 minutes regroups the pairs – the students in each pair challenge each other to decipher the transcriptions). - Stage 6 – Repeat the procedure for the remaining symbols.
For Homework: - Ask the students to revise the cards for four days. This won’t take them longer than 5 minutes a day, and yet this is essential because this is the way memory works. Quiz them in the next class.
- If you have something like a group blog, you could share links to these resources:
An interactive phonemic chart: http://www.macmillanenglish.com/phonemic-chart/
Videos for each sound (the can look closely at the mouth + repeat words after the speaker) http://www.bbc.co.uk/worldservice/learningenglish/grammar/pron/sounds/vowel_short_1.shtml - Print out these texts written in the phonemic script for the students to practice.
___________________________________________ - Here are some more web resources that I found, but most of them were above the level of my false beginner students.
http://www.cambridgeenglishonline.com/Phonetics_Focus/
http://www.tedpower.co.uk/phonetics.htm
http://www.agendaweb.org/phonetic.html - Also, you could organize a tongue twister competition using http://www.voxopop.com/ Voxopop is a free tool that allows you to create ‘discussion threads’ – students can record messages and add them to the thread. As the site shows the duration of each message, it’s easy to set a competition: the student with the shortest message that contains no mistakes is the winner!
Here’s what a discussion looks like: Discussion » The story of three free fleas. And here are some tongue twisters to practice problematic sound pairs: http://www.speaklikeastar.com/2008/08/speech-training-improve-your.html; http://international.ouc.bc.ca/pronunciation/

___________________________________________
Please feel free to comment! All suggestions how to improve this lesson /ideas for additional games or activities for homework and links to resources are highly appreciated – as always.
